Building my Home Server
How, why, and what I learned building my own home server.
Sep 6, 2022 •
20 min •
4108 words
Table of Contents
Tags
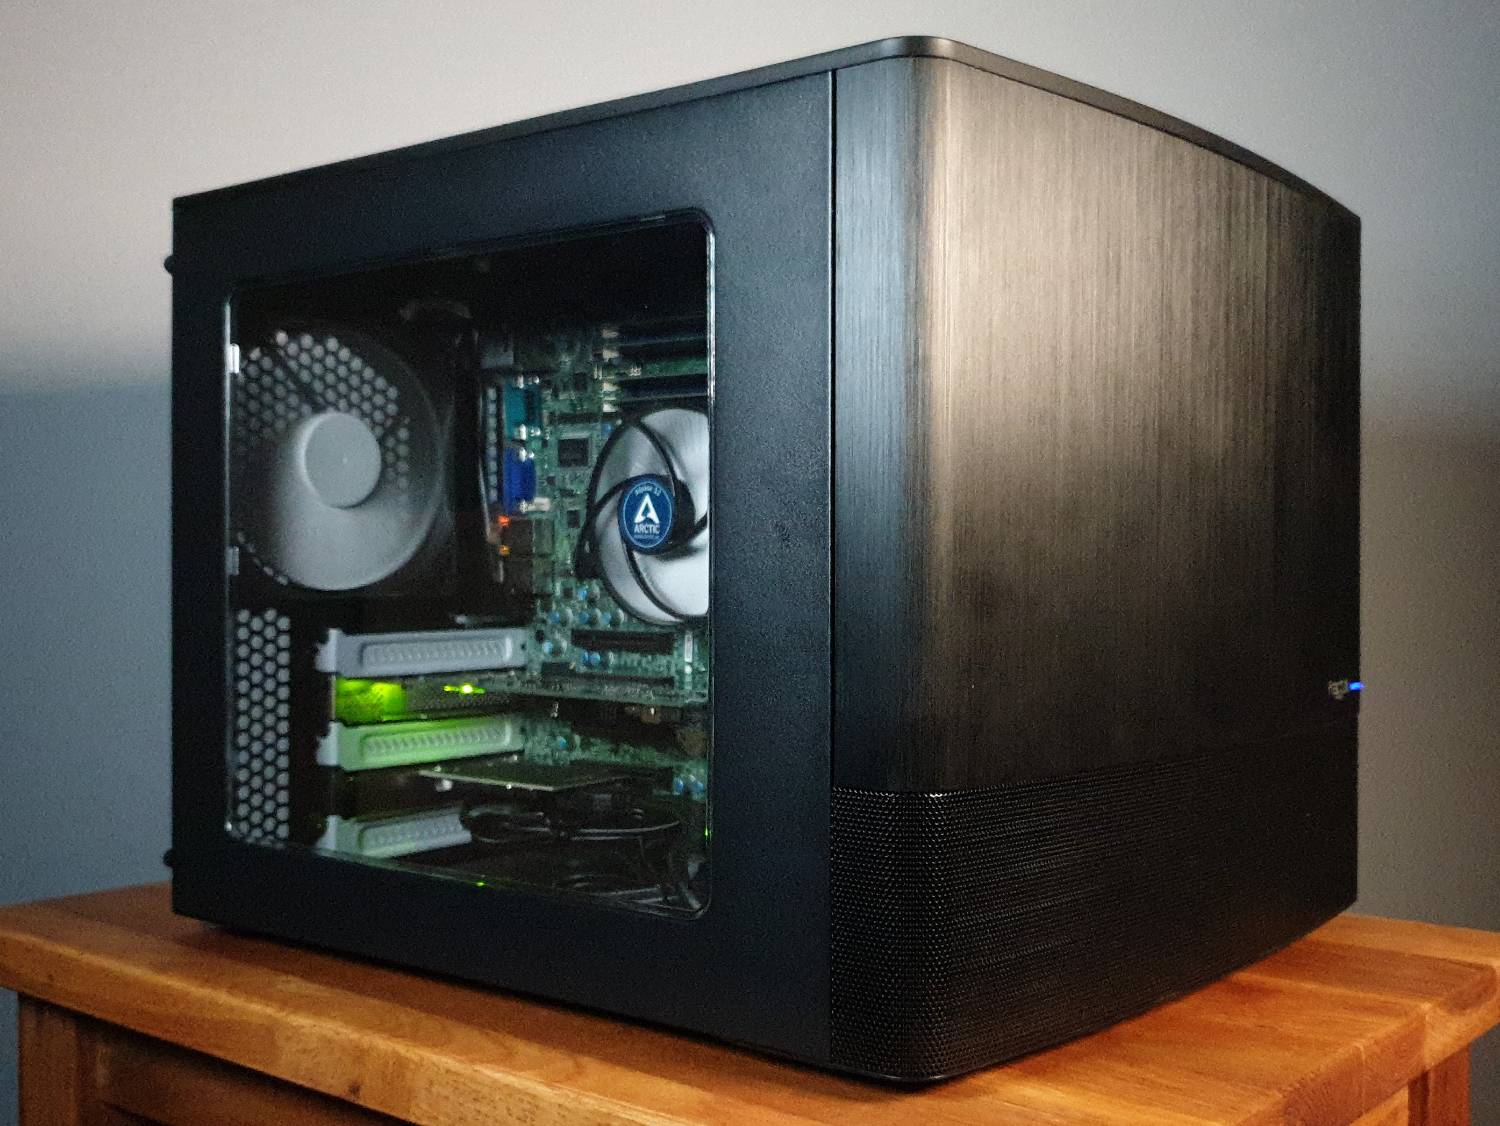
In 2020, I decided to build my own home server in an attempt to take control of my data and move out of the cloud. This solution is not for everyone, but here is how I did it and succeeded spectacularly while learning a lot along the way.
My experience with a NAS product #
My first NAS was a WD MyCloud EX2 Ultra which I bought in 2017. It is a tiny, 2-bay, all-in-one, and simple-to-use NAS which I used to store backups of my devices and my media library. All I had to do was purchase it along with two hard drives, install the drives into the NAS, then switch it on and change the settings to my liking.
I was pleased with how the device functioned overall for some time, but the main reasons I decided to consider replacing it stemmed from the limitations of all-in-one NAS systems like the WD MyCloud found in both the hardware and the software.
Restricted drive capacity #
The WD MyCloud NAS is limited in its storage capacity by only having 2 physical drive bays. I had 2 8 TB drives installed when I used this NAS and set them up in the RAID-1 configuration for redundancy, which meant I only had 8 TB of usable space.
Limited transfer speed #
Although the NAS has a gigabit network port with a real-world maximum transfer speed of about 114 MB/s, I only experienced about 60-65 MB/s in the most forgiving workloads and even slower in others. This is likely due to the underpowered SOC running the NAS being unable to keep up. Because it is built into the system, there is no way to replace it with something more powerful, making it a substantial, permanent handicap. The NAS’s web interface also got progressively slower while losing features and becoming less responsive with each update to the firmware, making it irritating to use.
Lack of utility #
All things considered, the WD MyCloud EX2 Ultra isn’t just a NAS but a compact server. It even has its own minuscule and limited “app store” where one can download server apps to their NAS. The few available apps are a major weakness in this, but as I mentioned previously, the SOC of the NAS is barely capable enough to run the NAS as it is, so adding apps on top of it will simply slow things down even more. None of the apps in the curated list interests me or are particularly useful on underpowered hardware.
Proprietary software #
The NAS running proprietary software was not something I was concerned about in the slightest when I purchased the NAS, as I was blissfully unaware of its limitations and dangers. I only learned of the untrustworthy nature of proprietary systems sometime after choosing the NAS and that the very NAS I was using had a backdoor built into the software1.
With this glaring vulnerability in the proprietary firmware, the full disk encryption, which I couldn’t find any documentation about, is likely no better. No one knows how many security holes remain undiscovered in this NAS, and it’s the same story with other prominent NAS manufacturers who hide the code which runs on their customer’s devices. It is also susceptible to a myriad of malware and ransomware attacks, encouraging me even more to block its internet access at the router.
Regardless of remaining vulnerabilities which could cause data leakage, ransom, or destruction, the remote access feature makes it clear to us that WD has access to our files on our WD NAS over the internet2, which should make you feel uncomfortable.
My three goals #
Storing a lot of data #
Coming from the unsatisfactory all-in-one NAS I mentioned above, I wanted to build my own place to store my data with room for future expandability. I wanted something of a reasonably sized form factor which could comfortably live in a small cupboard out of harms way, as my old NAS did. Succinctly, I wanted something small in size but big on drive bays. The case I chose to build the server in was a Node 804, and it achieved this very well. I purchased this case new for only £60, and it gets the job done nicely with a sleek design and windowed side panel. I don’t have a server rack or the space to keep one, so a server case was not an option on the table.
Although the case is tens of times bigger than my old NAS, it is still reasonably small for a computer case. It can hold 10 3.5-inch hard drives, which was the main reason I chose it, along with its small size and respected manufacturer. I will only be using 4 of the drive bays right away but may expand in the future if needed. I’ll be using ZFS as the filesystem because of its error scanning and correction, redundancy options, and handy features like snapshots.
Replacing the cloud #
You’ve likely heard of people deciding to host their own website or chat server at home, but there’s a lot more you can host yourself these days. It’s straightforward enough for even a novice to host anything from a fully-fledged streaming service to a small file-sharing tool. In my case, I wanted to install Bitwarden, a password manager, and host it on the server. If you sign up for a Bitwarden account through their website, you’ll create an account on their server, meaning every password you register is sent to them and Microsoft.3 Don’t get me wrong, I’d trust Bitwarden or 8bit Solutions LLC far more than LastPass, Dashlane, Apple, Google, or the like, but I’d preferably, no, demand to have it so no one has access to my data but me.
It doesn’t just end with a password manager, however. I wanted to host my own little suite of applications to replace the cloud-based ones I relied on. I wanted to take my data back and restore my privacy. We forget that when we upload to the cloud, whether it’s an online chat or file upload, our data is sold4, shared5, stolen6, monitored7, and what else happens to it is out of your control. What happened to the saying “the internet is forever”? Setting up your own cloud replacement at home means unbeatable data privacy, full data ownership, and complete control over your digital life.
I regard the common internet saying below to be one of the most important things you can come to realize when you use one of these “cloud” applications.
“THERE IS NO CLOUD: It’s just someone else’s computer.”
A learning experience #
At the time, I had only brief experience with using Linux. I had tried Ubuntu on my old laptop but used it just as I did Windows, so I learned next to nothing. Since building my server, I’ve become fluent in the terminal and expanded my field of expertise by an order of magnitude. I manage the server confidently when I need to, I’m good at problem-solving when something goes wrong and having your own server to play with virtual machines and Docker is an extremely valuable asset. It even gave me the confidence to use a Linux-based OS as the main operating system on my PC, which I didn’t expect to ever do, though I knew it was an ideal but difficult move.
If you desire a solution that “just works”, this is not the solution for you. My server works, and it works very well, but it took much work and learning to get to this point. If you want my advice, I’d say if you’re learned and technical enough, go for it. In 5 years, when you consider building your own server again, you’ll ask yourself why you didn’t take the opportunity back then when you read this. Perhaps experiment in a VM running on your PC or VPS first, then go for it. Even an old PC or laptop is a perfectly fine NAS and VM platform to experiment with at home.
My three concerns #
Setup difficulty #
As I’m writing this over a year after the fact, I can confidently say that both building and setting up the server were not very difficult. The most challenging part by far was picking each component to be used in the server, but careful planning and consideration over a couple of weeks helped me get everything right.
Putting the server together is nearly identical to building a PC. The only differences I noticed being the motherboard is arranged a bit differently, the importance of hardware is weighted differently, and you may need one or two components you didn’t know existed beforehand (i.e. an HBA card for connecting more HDDs than the motherboard supports).
Installing the OS, in my case, TrueNAS CORE, was quick and easy, similar to the non-graphical Debian installer. Creating the ZFS pool of hard drives was trivial, thanks to the web GUI. However, I still opted to familiarize myself with managing ZFS in the terminal. Some ZFS options are not accessible in the GUI, and I may move from TrueNAS CORE to another OS in the future that may not have this luxury.
Power consumption #
Building your own server will require more electrical power than a compact low-power NAS from WD, Synology or the like. But what you get in return is more than a NAS with infinite uses and capabilities.
The server uses about 60 to 80 watts, which was probably lower than what I was expecting. It varies depending on CPU usage, of course, but I rarely tax the CPU over 40%, keeping it around 1% to 10%, 99% of the time.
In the event of a failure #
There hasn’t been any hardware failure or major software issue so far, but that doesn’t mean there won’t be any in the future. I configured my primary ZFS pool to RAIDz1, which allows for 1 of the 4 drives to fail without any data loss. This drive redundancy is just a helpful “get out of jail free card” so you don’t have to restore from a backup which can take a very long time and usually isn’t completely up-to-date. Though, this is not a replacement for a backup. If or when one of my drives does fail, the standard practice is to update your backup with the degraded pool, then work on getting a replacement drive in. ZFS should rebuild the array fully after that.
I’m confident that if a failure occurs, I’ll be able to handle it.
Some things I learned #
Digital independence #
I learned that with my own server, I never need to use or rely on the cloud ever again. With my data taken back from Google Drive and Apple iCloud, my data rests peacefully and undisturbed at home. When I need it, it’s there and accessible instantly, and when I’m away from home, I can tunnel into my network and access my data over a VPN for secure remote access. No one can snoop through my files, erase or deny me access to them, or interrupt my work with unexpected maintenance downtime. You could say owning a web server is like owning digital land and being a digital landlord.
It can benefit others, too #
With the incredible server software available today from talented developers, hosting something not just for your benefit but for the benefit of others is just so easy that it would be selfish not to. I host a couple of services for my friends and family—namely, Nextcloud for my family, a Google Drive replacement, and Rocket.Chat for my friends, a high-quality messaging app. Hosting these takes minimal effort, and updating them is a breeze, so why not let others join you and enjoy the unrivalled privacy and independence of a private server together?
Server apps are phenomenal #
If I told the average Joe I had a streaming service, they’d probably laugh or think I had newly discovered the Netflix app. The truth is that all my music, movies, and television shows live on my server, and I can stream them wherever and whenever I want using my streaming service, which lives on my own little server. I can stream them on the go with my phone, at home on my PC, or on the road in my car.
The benefits of hosting a media server may not be immediately apparent, but they include keeping your media habits private, truly owning the media you enjoy, and simply avoiding reliance on an external streaming service that doesn’t have your best interest in mind. I got used to it quickly, and I wonder why people put up with the practices of big streaming services. Apparently, people subscribe to more than one.
I’d wager the monthly fee cloud companies charge is a great deal higher than my server’s electricity bill. People subscribe to multiple music services, as many as 5 video streaming services, cloud drive storage for a few extra gigabytes of space, and sometimes pay for online chat. I will not make fun of people who don’t know how to set up a server, but I will laugh at those who think the prison they’re in is well-furnished.
Self-hosting VS cloud reliance #
I mentioned Bitwarden, the password manager, earlier in this post. I’d like to add that Bitwarden is, in my opinion, the best cloud password manager based on its security practices. Though, it just takes one data breach for that to change.
Furthermore, I’d like to reiterate how important it is to keep something as sensitive and valuable as a list of every credit card and password for every one of your accounts on the web safe at home. How and when did sharing such a thing with corporations and advertisers become commonplace? Every message we send to family and friends, too? Something happened to us and our society, but I don’t know what it was.
A few photos #
It’s a shame it lives in a cupboard.
Left side panel window #
The side panel window of the Node 804 case is fully transparent acrylic, and light shining into it makes the internals visually stand out.
I considered adding an LED light strip to light up the inside, but I don’t see the point because it stays in a cupboard, and I rarely see it.
Left side panel removed #
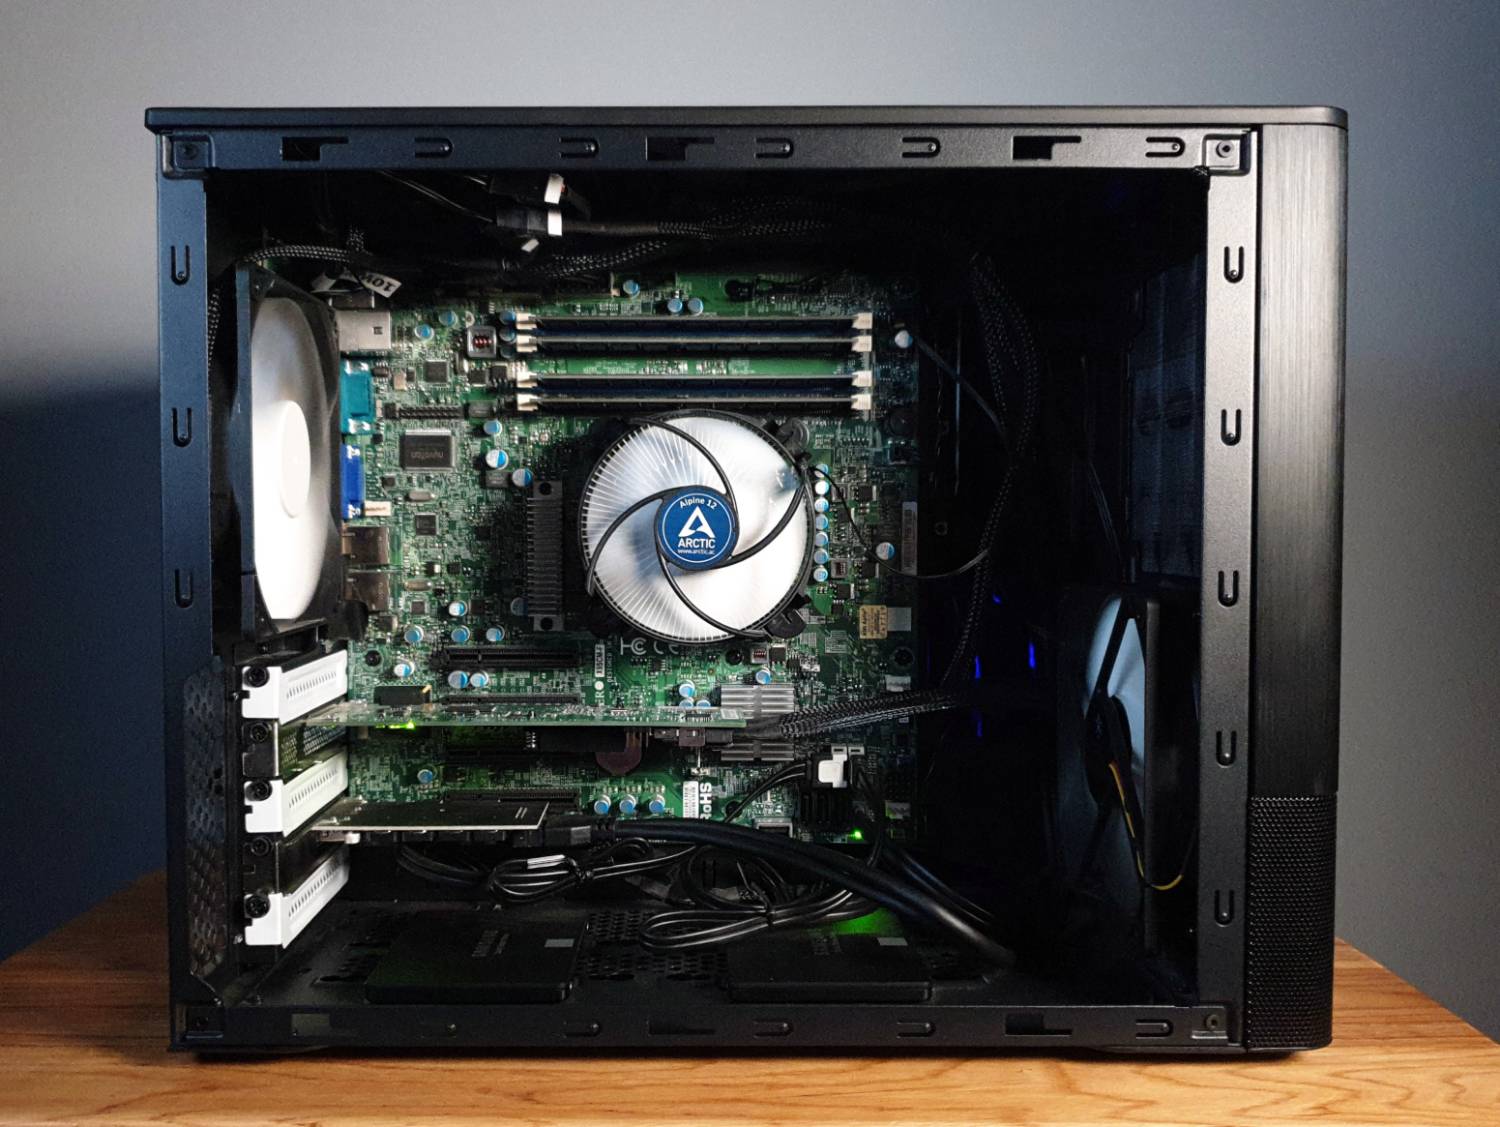
I decided to tidy the cables nicely, though this level of neatness is unnecessary. But still, if someone were to see it, I’d want it to be presentable.
I positioned the intake fan in the lower position because the HBA card runs quite hot, and it could use the direct airflow to its heat sink offered by this position.
Right side panel removed #
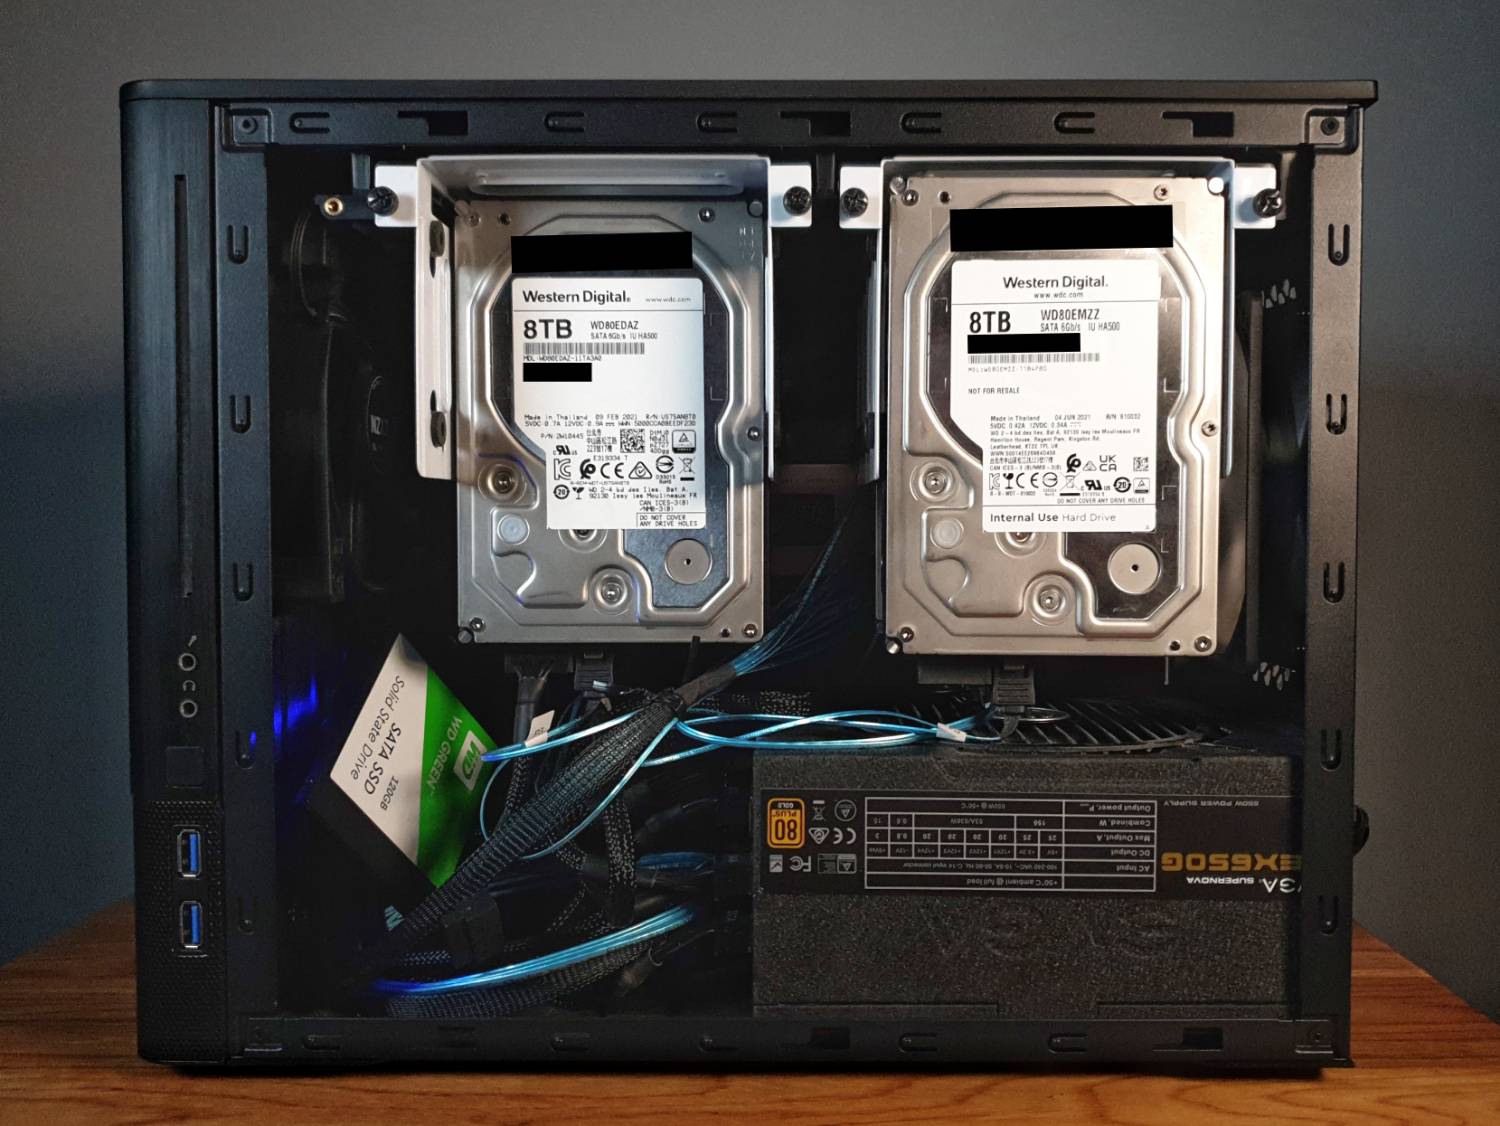
I staggered the position of the hard drives in the drive cages to spread the thermal mass and increase the air contact surface area to keep the drives cooler. The drive cages have an airflow passage, so cool air can be pulled in from the front and warm air removed from the rear, which isn’t clear in the picture.
You may notice the PSU is upside down. I chose to position it like this intentionally because the fan inside it is very loud, and having the fan face inside the case stops a surprising amount of the sound from exiting the case. This position is only ideal for some systems as the PSU’s fan pulls warmer air through itself, ejecting it out the rear of the case, which impacts its temperature. I never come close to the PSU’s maximum power output of 650W, so the PSU stays cool enough with constant airflow.
I’ve since moved the loose SSD in the picture to a proper mount where it’s screwed in, but a loose SSD inside a completely stationary home server isn’t that bad!
I added another fan to intake air into the hard drive area of the case. There’s a fan on the left and right end of the case in this picture.
PS: The WD Green SSD is very slow and low quality. I do not recommend it, though it is acceptable for a boot drive holding a lightweight OS.
The case #
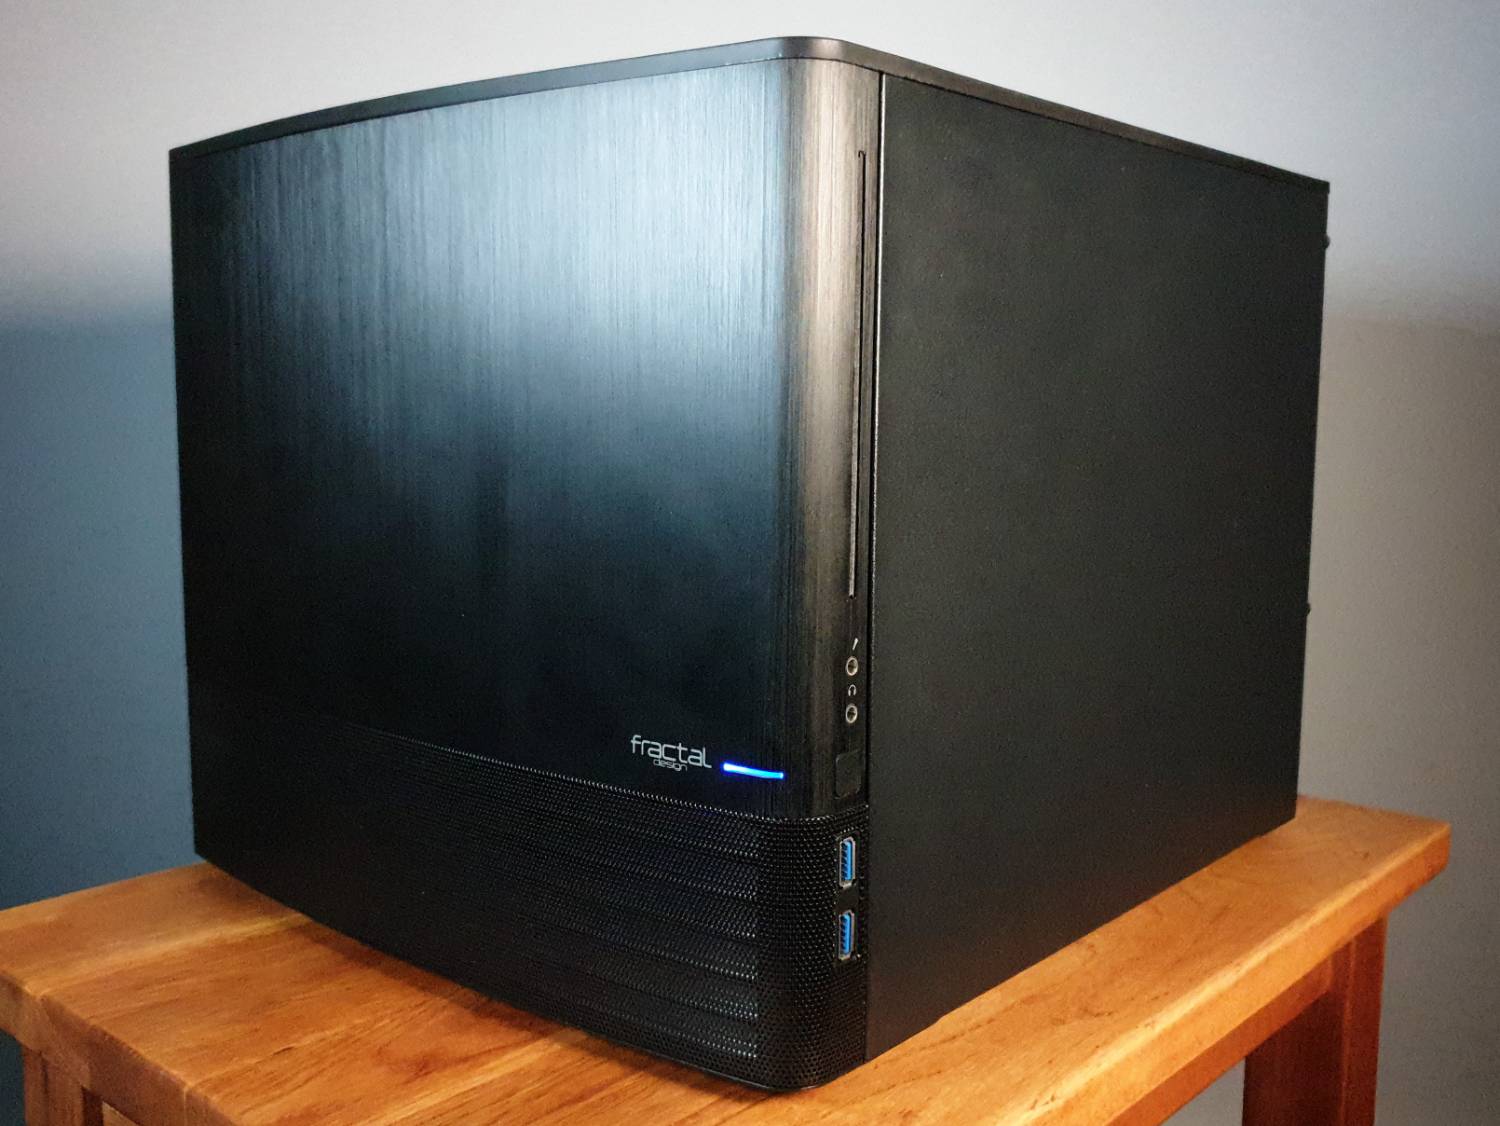
I considered putting some stickers on it, but I only have Google and Apple ones…
I’ll leave it as it is because I admire the uninterrupted sleekness of the case.
I purchased a USB PCIE card which plugs into the case’s USB 3.0 front panel connector and adds two extra USB 3.0 ports on the rear of the card. I didn’t end up using any USB devices and never have, although the ports in the picture are active.
Resources #
Hardware #
I took great inspiration from serverbuilds.net and their “NAS killer 4.0” templates and suggestions. Choosing server hardware is challenging, especially if it is your first time. I didn’t have the luxury of using PC part-picking websites as they rarely have server components in their database.
Parts list (excluding storage) #
| Part | Manufacturer | Product | My Rating |
|---|---|---|---|
| MB | Supermicro | X9SCM-F | 7/10, Good, but dated |
| CPU | Intel | Xeon E3-1270 v2 | 6/10, Somewhat power hungry |
| RAM | Supermicro | MEM-DR380L-HL01-EU16 | 7/10, Good, but dated |
| PSU | EVGA | SuperNOVA 650 G1 | 4/10, The always-on fan is loud |
| HBA8 | LSI | SAS9211-8I | 6/10, Runs quite hot |
| Cooler | Arctic | Alpine 12 | 9/10, Excellent, good value |
| Case | Fractal Design | Node 804 | 8/10, Excellent, few complaints |
Software #
Server operating systems #
I quite enjoyed both TrueNAS CORE and Proxmox, but I found TrueNAS to be better for my use on this server for the time being, but plan to have another server running Proxmox in the future. I may switch from TrueNAS to Proxmox on this server instead. I recommend trying both. Both are open-source, which should be a requirement when choosing an OS. Both more or less do the same thing but have different strengths and areas of focus.
While the UIs provided by OSs like TrueNAS and Proxmox are helpful, you should still aim to learn the fundamental terminal commands. If you switch to an OS without the exact GUI you’re used to, or want to configure a VM over SSH the same way you did the OS with the GUI, you will have no idea what the commands you need are.
Knowing the commands is necessary. If you rely on GUIs, you’ll be in for a shock when you realize you can’t do something as simple as deleting a Docker container in the CLI.
Operating systems for VMs #
Alpine Linux #
I believe most people’s first choice when creating a VM is Ubuntu Server, but I don’t see why. Perhaps the unfamiliarity of a terminal-based OS pushes beginners to choose the recognizably named Ubuntu, known for its desktop OS. I found Ubuntu Server to be far heavier than it needed to be, using a lot of system resources and including a fiddly, time-consuming installer. Consider running 4 Ubuntu Server VMs and all the wasted resources used by this OS 4 times over and how it would affect your server.
After noticing this, I decided to search for the most minimal Linux distribution, leading me to know Alpine Linux. Alpine Linux comes with a minimal set of applications, but most of the necessities are present, and the ones that aren’t are just an apk add command away, which is the package manager Alpine Linux uses and makes themselves. I’m a happy Alpine Linux user and find it perfect for use in VMs.
Debian #
Unfortunately, TrueNAS CORE does not support Debian VMs very well, which is something to note if you plan to use Debian with TrueNAS CORE. The main advantages of Debian are that it is very stable, is far more lightweight than Ubuntu Server, the OS is completely free software, and the Debian Social Contract is positive.
I plan on using Alpine Linux for the foreseeable future, even if this issue with Debian support in TrueNAS CORE is solved, because I quite like the minimal and simple nature of Alpine Linux, though it and Debian are my two personal VM distributions of choice.
Docker containers #
Docker is an incredible platform for server applications. Currently, all of my services run on Docker, and my experience with it has been outstanding. It makes it easy to download, run, update, and manage an extensive library of server applications made by tens of thousands of different developers and organizations. My personal favourite features include being able to organize the filesystems of many Docker applications to your liking and that every container can be identically replicated based on a single YAML configuration file.
If you’re considering hosting any server application on a server at home or on a VPS, I strongly suggest experimenting with Docker and testing some Docker applications. My only gripe with Docker is that when a container has an updated image available, you aren’t notified in any way. Subscribing to the developer’s repository RSS feed to get notified of new releases is an acceptable solution.
Portainer, a GUI for Docker #
I mentioned Portainer earlier in this post, but I thought I should expand on it and explain how it helped me understand Docker when I started from scratch. Portainer is in and of itself a Docker container. One that lets you manage and deploy other containers and makes doing so quick and easy, and makes learning the workings and terminology of Docker an easier task. It takes the form of a responsive and elegant-looking web interface which has a surprising amount of control over your Docker instance, letting you use the GUI almost exclusively. However, it is unwise to rely on this third-party GUI entirely instead of learning both the Portainer and the Docker terminal workflow.
Portainer serves as a great introduction to Docker for beginners. I uninstalled Portainer recently because I find myself relying on it too much out of laziness not to SSH into the VM and use the CLI. It is not necessary after all; you can learn how to use Docker without it and still pick it up and understand it quickly.
The result #
An ongoing success #
I can’t say this project ended in success because it hasn’t ended and won’t end until I pull the plug. I’ve learned that having your own server is a project that never ends and that your continued effort is rewarded daily.
This project is certainly not a “set it and forget it” affair. It needs manual intervention now and again to continue working smoothly, although not as much as you may expect. Assuming that is, you don’t experiment and play with it like I do, where you would be working on getting something up and running as an experiment. Playing and learning with it was one of my goals. Aside from this, the main tasks, or digital chores, boil down to updating software and backing up data.
Above all, I’m very, very pleased, and I can confidently say it was well worth it.
Things I’d do differently #
Perhaps I’ll use newer hardware next time. That’s the only thing I can think of. The benefits newer hardware offer are new and improved features, faster speeds, newer hardware support, and consume less power due to more efficient designs.
The motherboard’s IPMI web GUI is the only real area where the age of the components presents itself to me. It looks like how old websites used to look because it is exactly that, an old website my motherboard hosts. I like the old HTML style of websites, so to me, seeing it is refreshing and reminiscent of a simpler time. The downside of having this old IPMI is that you need Java to access the remote console, whereas new IPMIs use newer, more convenient and secure technologies.
There are no problems or quirks to speak of which I couldn’t solve. The experience has been great, with only a few instances of getting annoyed with a confusing issue.
Docker containers I use and recommend #
| Utility | Application |
|---|---|
| Personal cloud | Nextcloud |
| RSS client | FreshRSS |
| Password manager | Vaultwarden |
| Media server | Jellyfin |
| Chat server | Rocket.Chat |
| Uptime monitor | Uptima Kuma |
| DNS AD-blocker | AdGuard Home |
| Home VPN | WireGuard Easy |
-
WD backdoor: https://www.techspot.com/news/72612-western-digital-cloud-drives-have-built-backdoor.html ↩︎
-
WD remote access: https://products.wdc.com/nas0s5/nasum/en/index.html#t=MyCloud%2FCloudAccess%2FCloudAccess.htm ↩︎
-
Bitwarden discloses your passwords are stored on Microsoft’s servers: https://bitwarden.com/help/data-storage/#on-bitwarden-servers/ ↩︎
-
One example of the personal data of about 500 million people being sold (LinkedIn): https://www.cnet.com/tech/tech-industry/microsoft-linkedin-closes-acquisition-26-2-billion/ ↩︎
-
One example of private data being shared without permission (Amazon CCTV): https://www.deseret.com/2022/7/13/23206976/ring-doorbell-video-footage-police-without-owner-consent-amazon-privacy-edward-markey/ ↩︎
-
An incomplete list of companies that were hacked and data was stolen: https://wikiless.org/wiki/List_of_data_breaches/ ↩︎
-
One example of a population surveillance program: (thanks, Edward Snowden) https://wikiless.org/wiki/PRISM ↩︎
-
To connect the LSI HBA card to my SATA drives, I needed a
Mini SAS to SATA Cableas the HBA card uses Mini SAS connectors. I also flashed the firmware toIT Mode. ↩︎